


My past self can attest that I have not always been a very organized person.
Oftentimes, just as my head would drift instinctively towards my pillow to sleep, I would be bombarded by the late-night realization that I had only completed about half of the night’s homework; I could probably have found the detailing of the incomplete half on a crumpled up sticky note reminder that I had forgotten about almost instantaneously. Other times, my pledges of productivity after school would end in me spending countless hours just trying to organize the tasks at hand rather than actually completing them. Every plan, every list, and every detail I would inevitably neglect were all in different places at different times, thrown either in the bottom of my backpack or jotted down on a document I would never revisit.
Not to be dramatic, but Google Sheets changed virtually everything.
Instead of scrambling to find lost notes or wasting hours planning instead of carrying out my plans, I finally have a system that works. With everything in one place—clearly structured and easy to update—I can now track my tasks without the unnecessary chaos I once endured. While it took a bit to get a hang of, I am confident that I have now mastered the perfect guide to taking full advantage of Google Sheets with an assignment planner that maximizes my productivity and keeps me from becoming overwhelmed by my many to-dos in all sectors of my life.
Step One: Personalize

Before diving into the technical setup, it’s important to make your Google Sheet feel like yours. A planner is only effective if you actually enjoy using it, so taking the time to customize it to your preferences will make all the difference. Start by choosing colors and fonts that keep you motivated. Whether you prefer a sleek minimalist look, a vibrant aesthetic, or soft pastels, adjusting cell colors and text styles can make your planner more visually appealing.
Step Two: Get Technical
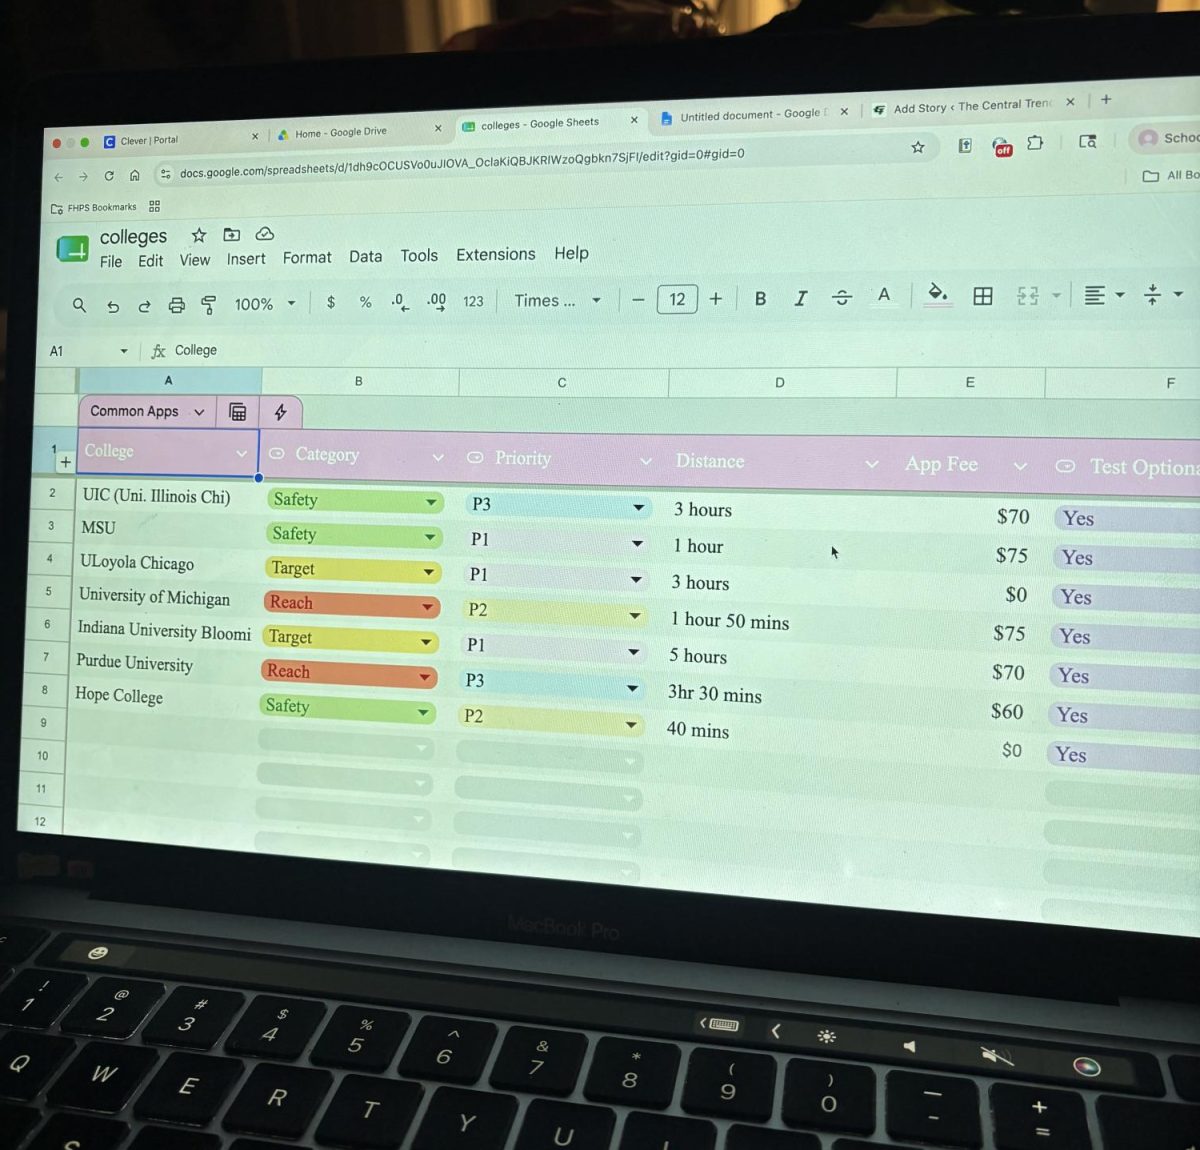
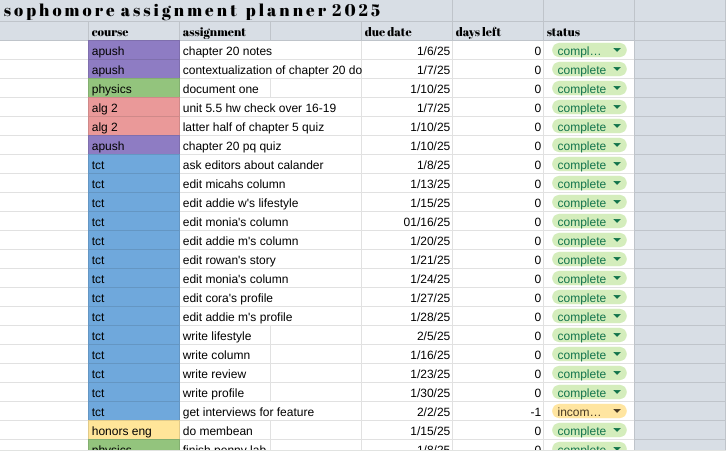
The system I have set up details five different columns to stay on top of my studies: the course I have an assignment in, the name of the assignment, the due date, days remaining until the due date, and completion status. Of these five columns, there are three that require a more complex dive into the features of Google Sheets.
The first column, entitled “Course,” requires you to use the element conditional formatting. Located under the bookmark “Format,” implementing this feature will automatically color code courses. For example, when I type in “APUSH,” it will automatically turn the color purple; each one of my listed courses has a selected color that they highlight when typed. For a more visual tutorial on how to use conditional formatting in this context, I recommend watching the YouTube video cited here.

The second column, “Assignment,” is pretty straightforward; simply write the name of the assignment you need to complete, and you’re done. Additionally, the third column only requires you to write the due date of the assignment. Getting the due date right will be critical in the next step.
The fourth column includes more intricate features, such as the automatic countdown under “Days Left.” To get this feature to work, your countdown must be in the column to the very right of your listed due date, as shown on the left. Next, you must type in a specific sequence that will allow for your countdown to operate correctly. That sequence is as follows: TODAY()-E(row number). You can find the row number on the far right of your screen, highlighted in blue. After typing this equation, hit “Enter,” and you will be able to know how many days you have until an assignment is due. To the right, the very bottom row of my provided example details the equation. 
The final column, “Status,” requires you to create dropdown menus. To do so, highlight the range where you would like to insert your menus, go to “Insert,” and then “Dropdown.” From there, you will be able to create as many status options as you’d like; mine includes “Complete,” “Incomplete,” “Study Block,” and “Overdue.” You can find an extensive how-to about dropdown menus here.
Step Three: Use!
Now that your planner is set up and personalized, it’s time to actually use it. The key to making Google Sheets your productivity powerhouse is consistency—the more you rely on it, the more second nature it becomes. Start by inputting assignments as soon as you receive them.
 Whether it’s a small homework task or a major project, adding it immediately prevents last-minute surprises (and those dreaded midnight realizations). Make it a habit to check your sheet daily, updating statuses and crossing off completed tasks for that extra sense of accomplishment.
By personalizing your planner, setting it up with smart features, and committing to consistent use, you can transform a chaotic schedule into a well-oiled machine. The beauty of Google Sheets lies in its flexibility; it adapts to your unique workflow and helps you stay organized, productive, and on top of everything that comes your way. Happy studying.